C# AWS Lambdas with Onion Architecture
In this post I’m going to try and document my experience of learning AWS Lambda with C# and applying Onion Architecture to my .net solution.
Although I have used Onion Architecture many times on my types of project I have never written any AWS Lambda before and I had never seen any examples where this architecture is used. Most examples of Lambda seem to be just ‘Hello World’, so I decided to try it out myself and create this post to document it. Because I’m new to AWS, a seasoned practitioner might find some room for improvement in some of the things I’ve done.
Warning - this turned into a long blog post, so you might want to get a coffee now before reading.
You can find the code used in this blog post on my GitHub repository.
What is Onion Architecture ?
So before we dive into examples of how to setup an Onion Architecture for your solution, let me take a bit of time to explain what it actually is. Onion Architecture is a layered architecture style first documented (to my knowledge) by Jeffrey Palermo in 2008.
Unlike an n-tier architecture which promotes arranging your dependencies in a vertical manner, Onion Architecture (and other similar architectures such as Hexagonal and Clean) promote arranging your dependencies in an inward facing manner.
I’ve been using Onion Architecture for a number of years now, and it’s never failed to help me produce a solution that is well laid out and maintainable. It’s an excellent architecture pattern to promote loose coupling between layers and makes separation of concerns easier. Whether the solution has been a monolith or micro-service. Whether it has been a web-app, windows app, or even a Xamarin forms app, it has made no difference and the result has been a successful easy to maintain implementation every time (If you would like to know more about Onion Architecture from Jeffrey Palermo, you can see his blog post here).
My Onion Architecture Implementation
I don’t want this blog post to become too long so I’ll probably write a separate post about how I use Onion Architecture in more detail. For the purpose of this article you just need to know a few key details.
Usually my solution is arranged like this.
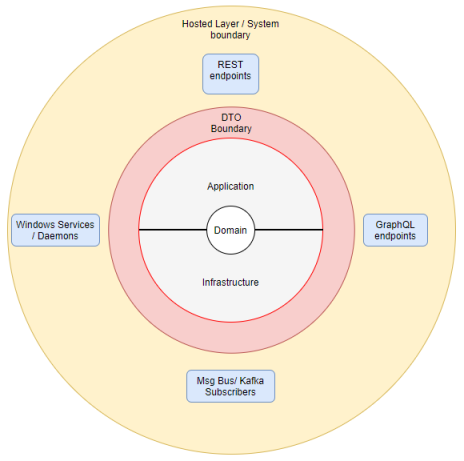
1) The System Boundary contains hosted processes (hosted processes, some examples would be a web-API, a service process or a console app)that take input from somewhere - a user clicking a button, an event being delivered from a message queue, or a HTTP message coming in to a REST/GraphQL endpoint.
2) The Application layer is an orchestration layer. This layer is sent commands and queries. When a command/query is received this layer will use the infrastructure layer, and the domain layer to perform whatever actions are needed to process the command, or get data to fulfill the query. This layer performs no business logic.
3) The infrastructure layer deals with talking to external things, like databases, files and third-party APIs. The repositories in this layer are responsible for reading the domain model from the database, and saving it back to the database when there are changes.
4) The Domain layer contains the domain models, these are classes which implement the business functionality and enforce invariants (which is another way of saying they enforce business rules). It is only referenced by the application and infrastructure layer and does depend on any other layer.
5) The DTO Boundary is not an actual layer. My art skills aren’t very good but what I’m trying to show here is that communication between the Service Boundary and the Application Layer is only done through some form of DTO I tend to use
- Commands to ask the Application Layer to perform an action that has a side effect (causes a change).
- Queries to ask the Application layer for data
- DTOs to return data from queries.
Sending commands & queries to the application layer and returning DTO objects is made easy by using the Mediatr and AutoMapper nuget packages which were created by Jimmy Bogard.
What I Think an AWS Lambda is
After reading about AWS Lambda I understood that they offered serverless on-demand processing and ran at a function level (eg a single web API endpoint), as opposed to a container hosting a process which provides many functions (eg. a web API with multiple endpoints). So it makes sense that best practice seems to be that a Lambda does one thing.
But I was unsure if this meant that I would be limited in how I have to structure my applications and prevent me from using the architecture that has served me so well in the past.
Most examples I have seen are far too simplistic, showing little more than ‘Hello World’ in a single C# file.
I feel that if these examples are followed in an enterprise application the result will be a domain model for a single domain being spread across many Lambdas. In my opinion this is highly undesirable because it will make it difficult to have a consolidated view of the business rules, and enforce them without potentially having to copy the same code across numerous Lambdas. It also couples more of the code to the Lambdas themselves, meaning that if in future you decide to switch cloud provider or move away from using FaaS then you will have a lot more work to re-implement.
I should point at this point that I don’t subscribe to the belief that a micro-service has to be made up of a single runtime component.. In my opinion a micro-service represents a bounded-context and when deployed this is made up of however many runtime components are needed to support that context. Having a hard and fast rule that a micro-service has to be one single runtime component can lead to micro-services that are not truly independent of each other (effectively nano-services) and have to be updated and deployed in lockstep.
My Target Architecture
I decided my target architecture for this prototype would be largely the same as what I had done previously, but with AWS Lambdas in the System Boundary layer. If this is possible then adding AWS Lambdas into my future projects would be pretty simple and I would not need to fundamentally change how I design my software.
This would mean I can keep my domain layers 100% unit tested too which is something I find invaluable (and easy to achieve because the domain layer has no dependencies or other layers). Another bonus would also be that introducing AWS Lambdas into my existing projects would be also very easy - all I would need to do would be to write some Lambdas to trigger the application layer using the existing commands, queries and DTOs.
So my new target architecture diagram will look pretty similar to the previous version.

Time to start coding…
A First Attempt
I started off by creating a new .net core solution with a made up domain, app layer and repository layer.
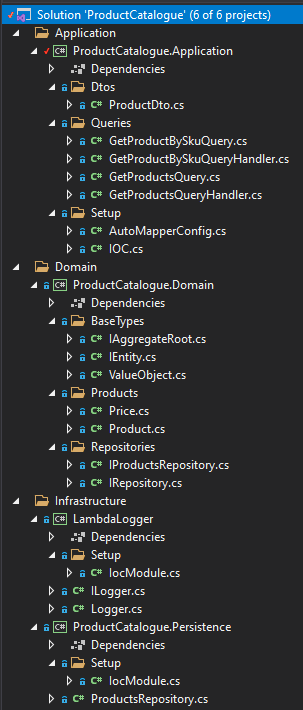
There are quite a few files in this example, but it’s all fairly simple and they are all small.
I won’t go into detail describing how I’ve implemented the Domain or Infrastructure layers as that isn’t the point of this blog post.
For this example the repository retrieves a hard coded set of products, or a single one by SKU (stock keeping unit).
Implementing The Application Layer
The application layer has a couple of classes in the queries namespace - GetProductBySkuQuery and a GetProductsQuery.
These are implemented as MediatR requests and can be that send by any class that needs to query data from the application layer.
Each of these query classes has a corresponding handler, these are the classes that MediatR will instantiate and invoke when the corresponding command/query is sent.
In this example the query handlers are GetProductBySkyQueryHandler and GetProductsQueryHandler.
Finally in the application layer we have a DTOs namespace, with a single DTO representing what a product will look like when it is passed out of our application layer.
The implementations of the MediatR command & queries are very simple.
Here is what the GetProductBySku query and then handler look like, along with the DTO that is returned.
GetProductBySkuQuery.cs
public class GetProductBySkuQuery : IRequest<ProductDto>
{
    public GetProductBySkuQuery()
    {

    }

    public GetProductBySkuQuery(Guid tenantId, string sku)
    {
        this.TenantId = Guard.Against.Default(tenantId, nameof(tenantId));
        this.Sku = Guard.Against.NullOrWhiteSpace(sku, nameof(sku));
    }

    public string Sku { get; set; }

    public Guid TenantId { get; set; }
}
GetProductBySkuQueryHandler.cs
public class GetProductBySkuQueryHandler : IRequestHandler<GetProductBySkuQuery, ProductDto>
{
    private readonly IProductsRepository _productsRepository;
    private readonly IMapper _mapper;

    public GetProductBySkuQueryHandler(IProductsRepository productsRepository, IMapper mapper)
    {
        this._productsRepository = Guard.Against.Null(productsRepository, nameof(productsRepository));
        this._mapper = Guard.Against.Null(mapper, nameof(mapper));
    }
    public async Task<ProductDto> Handle(GetProductBySkuQuery request, CancellationToken cancellationToken)
    {
        Guard.Against.Null(request, nameof(request));

        var product = await this._productsRepository.GetBySkuAsync(request.TenantId, request.Sku, cancellationToken);
        return this._mapper.Map<ProductDto>(product);
    }
}
ProductDto.cs
public class ProductDto
{
    public Guid Id { get; set; }
    public Guid TenantId { get; set; }

    public decimal Price { get; set; }

    public string Description { get; set; }

    public string Name { get; set; }
}
As you can see they’re simple. The commands/queries/DTOs are just standard classes. Commands & Queries have to implement IRequest
The Command/Query handler implements IRequestHandler<T1,T2> and has just a constructor (so we can inject the dependencies) and a single, very short Handle method.
In my experience, most commands/queries implemented in the application layer are roughly this simple even in the most complicated applications.
Adding Some AWS Lambda Projects
At this point we essentially have a solution that works, which could be prove by calling the Application layer using a console app or unit testing framework.
But we are going to do this using AWS Lambda, and in keeping with the best practices we need a separate Lambda for each of the web API endpoints that we want to provide to the users of our application.
This is quite simple by installing the extension ‘AWS-Toolkit for Visual Studio’ and then using the new ‘C# AWS Lambda Project’ project type to add the new projects we need.
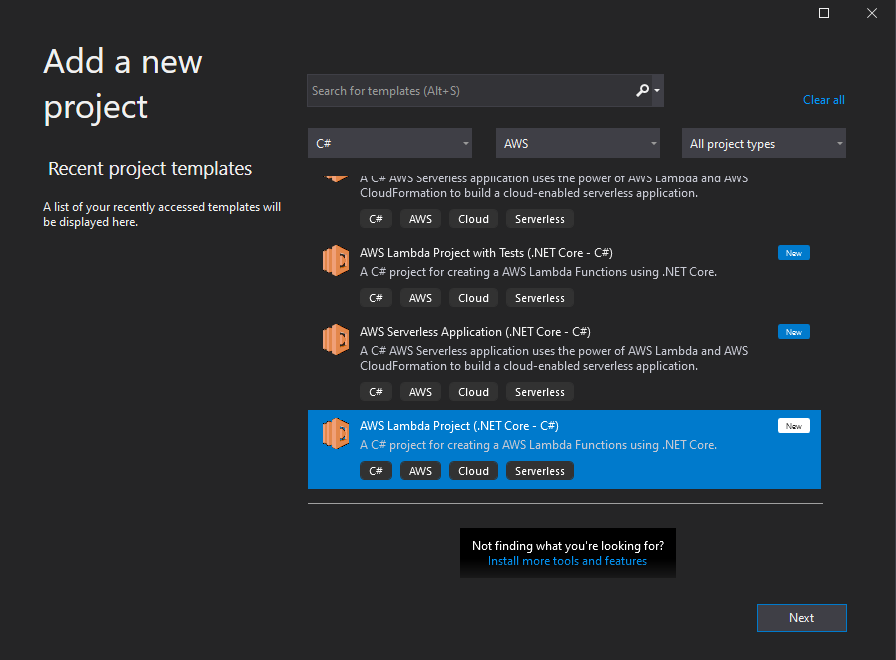
I used the AWS toolkit to create the two Lambda projects shown below

(If you are following along with this article you may notice that you don’t have any serverless.template files. These are files I added later to deploy the projects using AWS Cloud Formation. Ignore these for now, I’ll explain them later.)
Function.cs
Each of our Lambda projects has a Function.cs class, which the toolkit created for us. This is the entry point of the Lambda, lets take a closer look at the Function.cs file in the GetProducts Lambda.
[assembly: LambdaSerializer(typeof(Amazon.Lambda.Serialization.SystemTextJson.DefaultLambdaJsonSerializer))]

namespace GetProducts
{
    public class Function
    {
        private readonly IServiceCollection _serviceCollection;
        private readonly ServiceProvider _serviceProvider;
        private readonly Guid _tenantId;
        private readonly Lazy<IMediator> _mediatr;

        public Function()
        {
            this._serviceCollection = new ServiceCollection()
                .AddApplicationServices()
                .AddLoggingService();
            this._serviceProvider = this._serviceCollection.BuildServiceProvider();

            this._mediatr = new Lazy<IMediator>(() => this._serviceProvider.GetRequiredService<IMediator>());

            // JUST FOR TESTING, forces the tenant ID to be a known one so the user doesn't have to remember it
            this._tenantId = Guid.Parse("743872ea-7e68-421b-9f98-e09f35d76117");
        }

        public async Task<APIGatewayProxyResponse> FunctionHandler(APIGatewayProxyRequest request, ILambdaContext context)
        {
            var logger = this._serviceProvider.GetRequiredService<ILogger>();
            logger.SetLoggerContext(context.Logger);
            logger.LogInfo($"Fetching all products for tenant: {this._tenantId}");

            try
            {
                var query = new GetProductsQuery(this._tenantId);
                var queryResponse = await this._mediatr.Value.Send(query);

                logger.LogInfo($"Returning {queryResponse.Count()} records");

                // return result
                return new APIGatewayProxyResponse
                {
                    StatusCode = (int)HttpStatusCode.OK,
                    Body = JsonConvert.SerializeObject(queryResponse)
                };
            }
            catch (Exception ex)
            {
                logger.LogError($"exception; {ex.Message}");
                return new APIGatewayProxyResponse
                {
                    StatusCode = (int)HttpStatusCode.InternalServerError,
                };
            }
        }
    }
}
Both the Lambdas are pretty similar so let’s just concentrate on this one and break up what is going on…
Setting the JSON Serializer
First of all we have the [assembly: LambdaSerializer(typeof(Amazon.Lambda.Serialization.SystemTextJson.DefaultLambdaJsonSerializer))] assembly attribute.
The AWS-Toolkit added this for us and it sets up a JSON Serializer that is compatible with AWS Lambda. I’m sure it’s possible to use a different serializer implementation if you needed to, such as Newtonsoft JSON, but I’m happy with the default.
The Function Constructor
Next we have the class definition, and the class constructor.
In my example I have used the constructor to instantiate a new ServiceCollection and configure the IoC container by calling the AddApplicationServices() and AddLoggingService.
Next I setup a lazy instantiation of Mediatr by using the following line
this._mediatr = new Lazy<IMediator>(() => this._serviceProvider.GetRequiredService<IMediator>());
This allows the creation of Mediatr to be done within the constructor, but deferred until actually needed by the code that requires it.
The Function Handler
The next part of the file is the Function Handler method that will be invoked once our AWS Lambda has been created. The signature for this method is
public async Task<APIGatewayProxyResponse> FunctionHandler(APIGatewayProxyRequest request, ILambdaContext context)
Note that the request argument and the method return type are special in that we are using APIGatewayProxyRequest and APIGatewayProxyResponse respectively.
The argument and return types you will use in your AWS Lambda function handlers are specific to how your AWS Lambda is being triggered.
In my example I am creating API endpoints that will be accessible via a public API gateway so that I can call them from my PC (using Postman or a similar tool) when they have been deployed to the cloud. So to do that I have to accept and return the types required by the API gateway. If my Lambda was being triggered some other way then these types would be different.
The rest of the method is not very complex, and when you strip away the logging lines and the exception handling it will come down to just 3 lines of code. 1) Creating one of the MediatR commands. 2) Dispatching the command via MediatR and waiting for the response. 3) Serializing the command response into an API Gateway response body and returning it along with a status code.
var query = new GetProductsQuery(this._tenantId);
var queryResponse = await this._mediatr.Value.Send(query);
// return result
return new APIGatewayProxyResponse
{
    StatusCode = (int)HttpStatusCode.OK,
    Body = JsonConvert.SerializeObject(queryResponse)
};
Debugging Locally
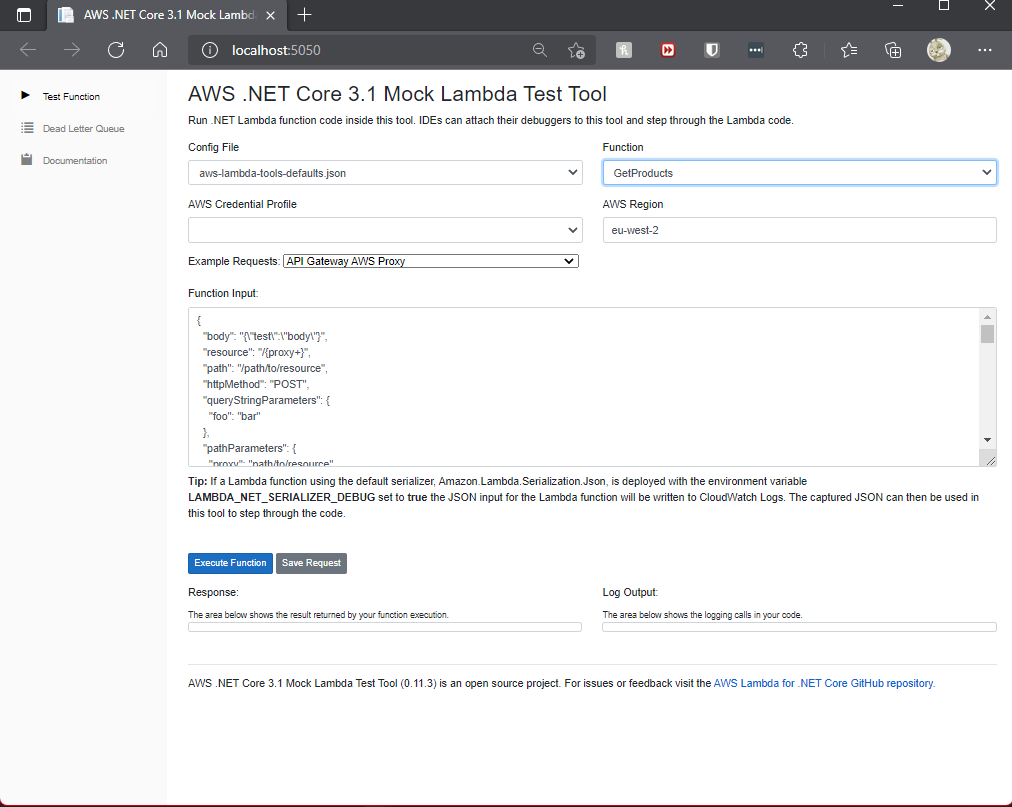
That’s it. This Lambda is now fully functioning, and you can test this by running the debugger. The AWS-Toolkit for Visual Studio understands how to debug an AWS Lambda locally by setting the AWS Lambda project as the start-up project and clicking the debug icon, which will launch your browser and show a special debugging page that you can use to invoke your AWS Lambda and step through it. Note: If you are writing a Lambda that will be triggered from API Gateway then you must use the ‘API Gateway AWS Proxy’ request type.
In Visual Studio select the ‘Mock Lambda Test Tool’ debugger and then start debugging. A web browser will open and show the AWS Lambda Test Tool.
Deploying To The Cloud
The final stage of my first attempt at using AWS Lambda is to deploy my Lambda projects them to the cloud. There are a number of ways to do this, but as a beginner I wasn’t really familiar with any of them. Fortunately the AWS Toolkit can come to the rescue again by setting up an AWS CloudFormation Template for us, and deploying it.
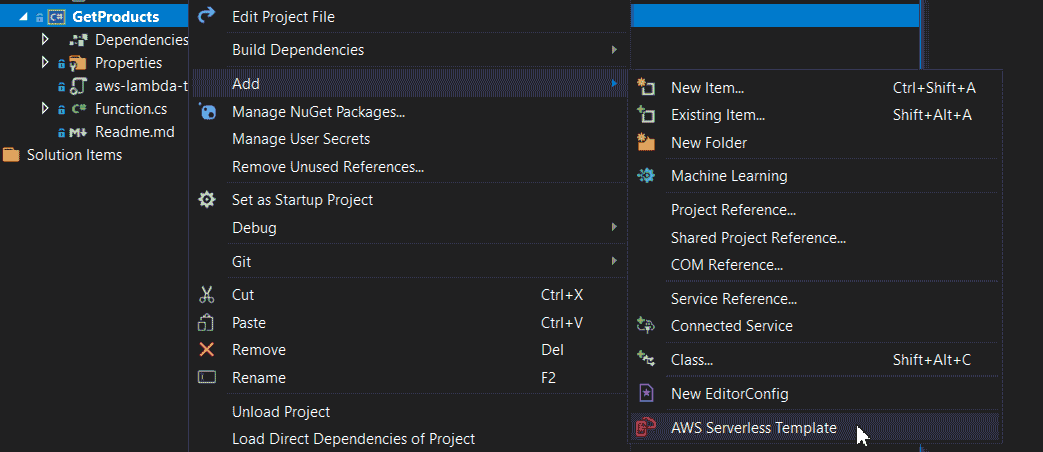
Simply right click on one of the Lambda projects and select Add | AWS Serverless Template
AWS Toolkit will then add a file named serverless.template. The contents of the file will look similar to what I’ve shown below. In the screenshot you can see I’ve highlighted some properties, these are properties I have changed from the default values.
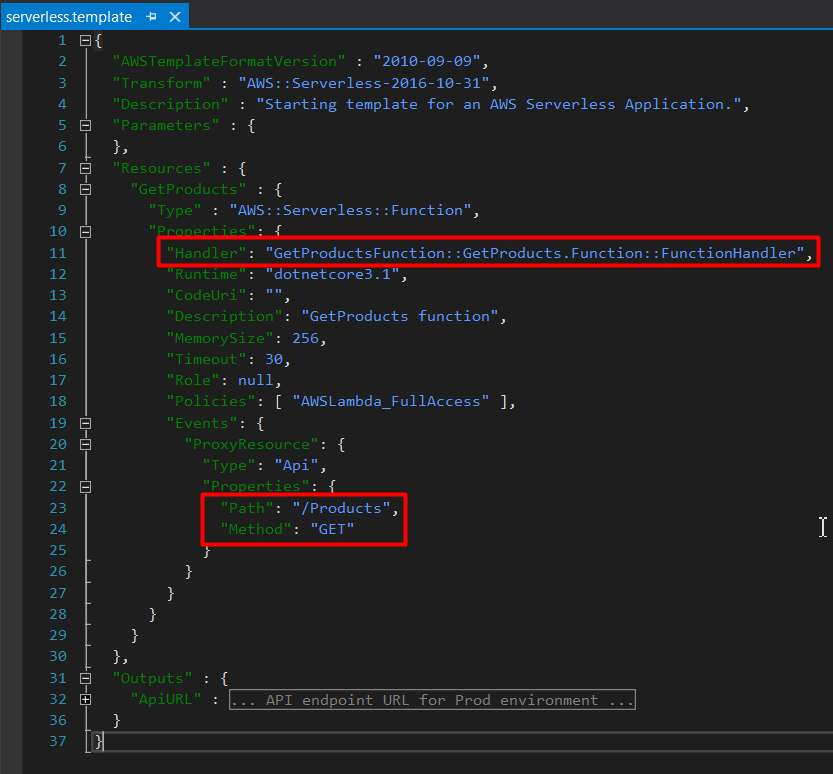
The Handler is the fully qualified path to the function handler that AWS Lambda will invoke. You should make sure that you include the assembly name (GetProductsFunction), the class namespace (GetProducts), the class name (Function) and the method name (FunctionHandler).
The Path and Method refer to the endpoint path you want to use to invoke your Lambda, and the HTTP method that you want your Lambda to use. I have set mine to be /Products and to only be used when a HTTP Get request is received.
With your serverless.template file in place you can now right-click on the Lambda project and choose Publish to AWS Lambda... You’ll then be shown a dialog where you can select the AWS profile, region, stack name and S3 bucket to use for the deployment. Once you’ve made your selections, click the Publish button and your deployment will begin.
If the deployment completes successful you should be able to call your API endpoint from a client or by using something like Postman.
The End
At this point everything deploys and works. Each of the Lambdas does one thing but backed by a shared architecture that promotes single responsibility in our code and allows us to build up a comprehensive domain model. All in all, I’m pretty happy with this implementation.
But maybe there’s a problem…
In a real enterprise solution if we are using this implementation pattern then as we expose new endpoints we will be adding new AWS Lambda projects.
Depending on your point of view this might be quite acceptable, but I think I would prefer if some of the Lambda projects contained more than one Lambda (though still deployed separately). As the solution grows, maybe these projects could be used to group the Lambda functions up according to the REST resource that they’re representing.
In this example the Product Lambdas would be together in a single project, but Lambdas for a different resource - maybe we decide to introduce some endpoints to get a user - could be located in a different Lambda project. This feels like a neater way of organising the code to me.
Thanks For Reading
If you’ve made it this far, thanks for reading and I’m sorry what I thought was going to be a reasonably sized post turned into such a monster.
Hopefully you’ve found this interesting, and if you’re new to AWS Lambda too then please take some time to experiment with it and try things out. I’ve been pleasantly surprised by how quickly you can get to grips with it and start building things.
In the next part of this blog I’ll talk more about how I tackled the problem of having separate AWS Lambda projects for each AWS Lambda, and I promise to make it shorter.
You can find the code used in this blog post on my GitHub repository.